Introduction to Concurrency in Python for Data Engineers
Multithreading vs Asynchronous vs Multiprocessing
👋 It’s been a while since I’ve posted something, so thank you for reading and I hope to continue on a more regular cadence from now! I write about data engineering, python and career growth.
Recently I’ve been deep diving into concurrency in Python as I worked on implementing it within a work project. In this post I’ll go over some of the concepts I’ve learned with practical examples. Thanks for reading!
Concurrency is a complex topic that takes some unpacking to understand it when it comes to implementing it in Python. Simply, it refers to the ability to execute multiple things simultaneously, but is a nuanced term due to the different implementations.

In life, sometimes we context switch between trains of thought to perform multiple tasks at once or to come back to frivolous ideas.
At a high level, a process, thread or task in Python can be viewed as a single train of thought and how we approach concurrency differs for each.
This is because Python is an interpreted language and has a global interpreter lock, which for standard Python implementations permits execution of only one line of bytecode at a time.
For I/O bound tasks such as writing to memory or making requests, time is spent waiting for tasks to complete, and not on computation. In this time, other threads could be spawned and switched to for performing additional tasks while waiting for others to complete.
When multiprocessing, each CPU core is leveraged as entire separate instances of Python interpreters will be running on each core. Computation heavy tasks will benefit from this kind of true parallelism since the processes would all be running independently at the same time.
Python’s asyncio package allows for concurrency while using only a single thread. It uses an event loop to facilitate the queuing, dequeuing, running and awaiting of tasks. With Python 3.11, writing async functions has never been simpler to implement, with better exception handling and more intuitive syntax, which we’ll go into more detail in this article.
Let’s go into each type of concurrency.
Multithreading
Python threading makes it feel like you have multiple things happening at once, but for standard Python implementations, there will always be one thread running at a time.
It’s useful for speeding up programs that share resources within the same process and spend time waiting for things to complete, such as writing objects to cloud storage. In the time waiting we can switch to another thread and start doing something else.
When multithreading, the operating system decides when the switching between threads occurs, which is known as pre-emptive multitasking. This can have negative side effects as interruptions in the middle of operations in your Python script may lead to race conditions causing bugs and inconsistencies. Although rare, over large numbers of runs, its bound to happen at some point and so you must ensure your code is thread-safe.
For instance, if you had a script which involved uploading multiple files to S3, you could make use of threading to speed up the time it takes, rather than doing it all sequentially. As the boto3 documentation states, using and sharing S3 client objects between threads is okay since clients are generally thread-safe, but resource objects are not.
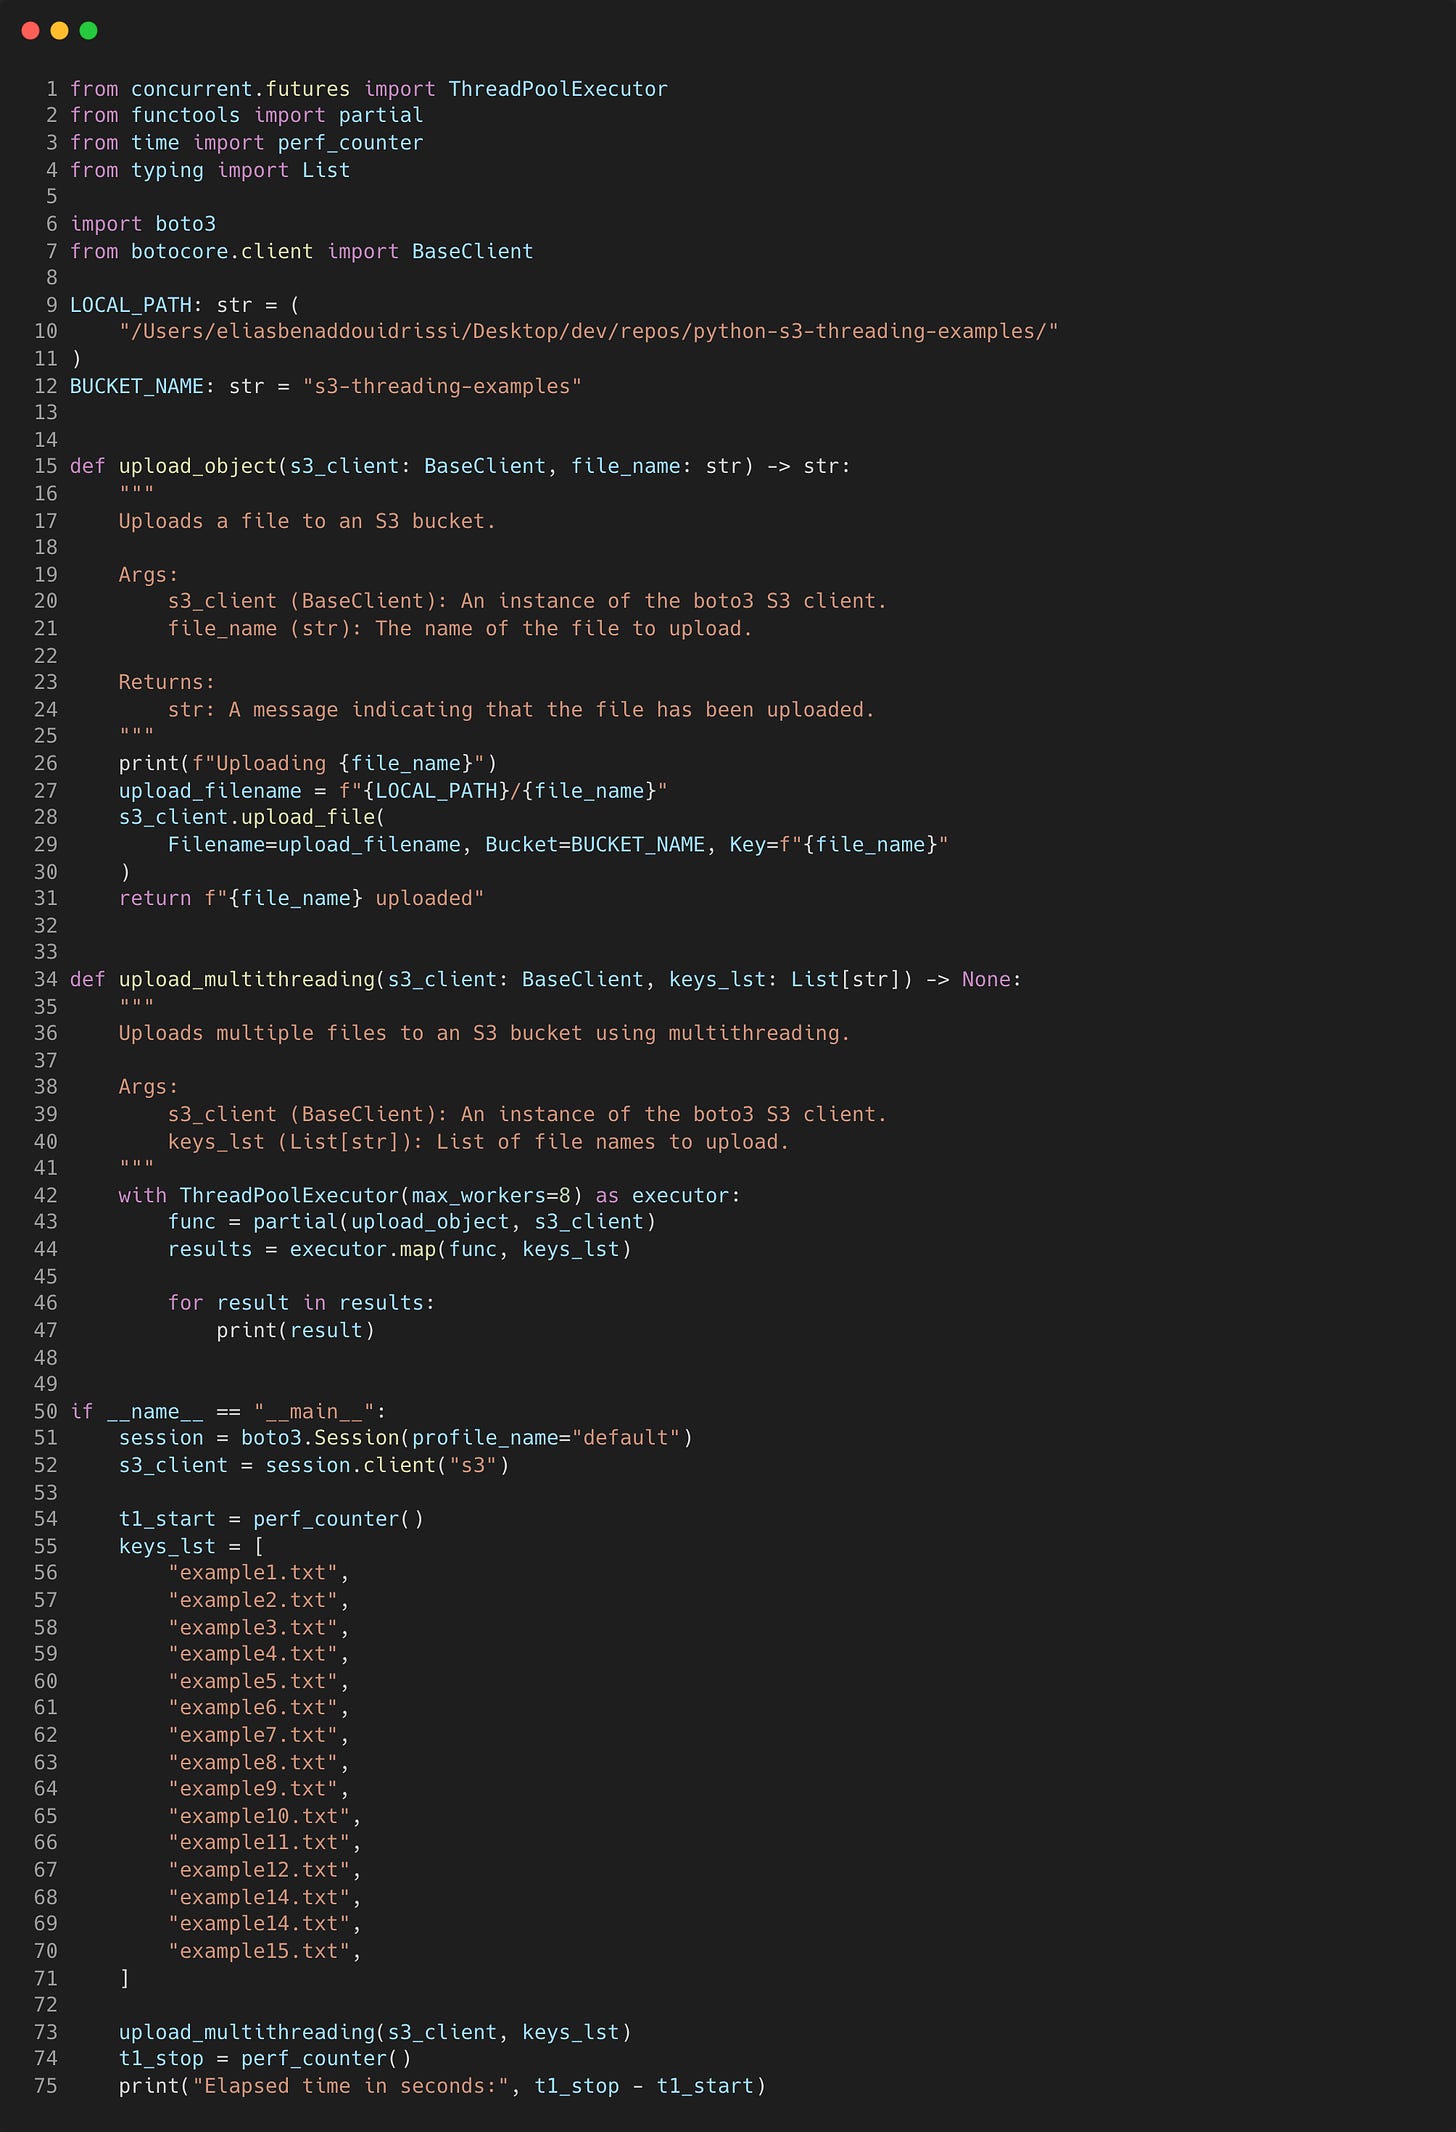
The code below shows how you can use multiple threads to upload files to S3. For the sake of simplicity it executes in seconds and the optimisation will be small. In reality, using threads is only worth the effort for long running scripts where the time savings will be substantial.
All code can be seen on Github via the links in the captions.
Pretty easy right? Let’s break down what’s happening here. First we define a simple “upload_object” function that takes in an S3 client and file name as arguments. It uses the “upload_file” method to upload to S3 and returns a string.
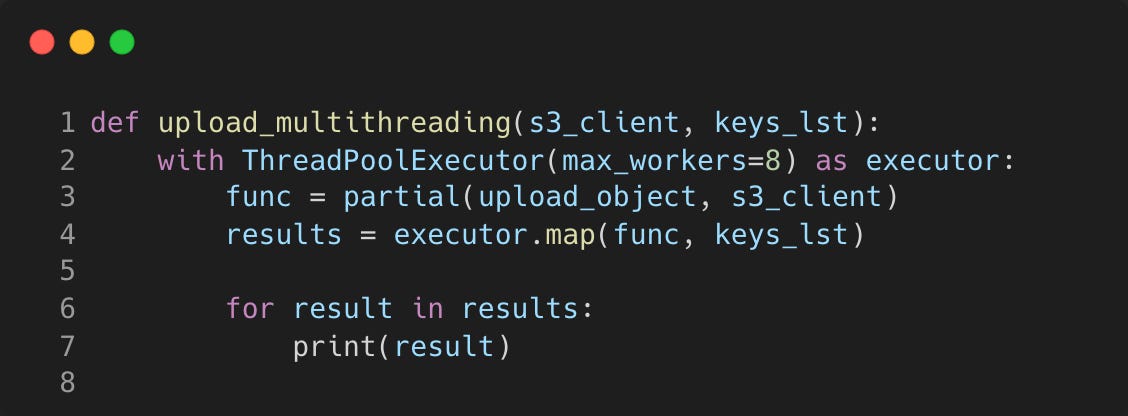
In the next function “upload_multithreading”, it similarly takes an S3 client, however now takes in a list of file keys to upload. We’re creating a ThreadPoolExecutor context manager that will use a pool of threads to run the uploads concurrently by importing it from the Python standard library concurrent.futures.
In this example, the ThreadPoolExecutor indirectly handles the way data and memory is accessed by each thread. By default, the max_workers argument will be set to the minimum of 32 or the number of CPU cores plus one of the machine it is running on. I have found that setting it to 8 works best for this example on my M1 Macbook Pro.
The optimal number of max_workers depends on your machine, what operations you are running and might require tweaking to achieve the best time. I recommend a read of this article about AWS Lambda function performance scaling using multithreading for some insights into maximum performance achieved.
We’re also using partials from Python’s standard library functools to create a new function that always has the S3 client as the first argument, and we are mapping this function to each item in the “keys_lst” within the executor.
Running this script with each example text file at 2MB in size, it took 2.18 seconds to upload all 15 files concurrently.
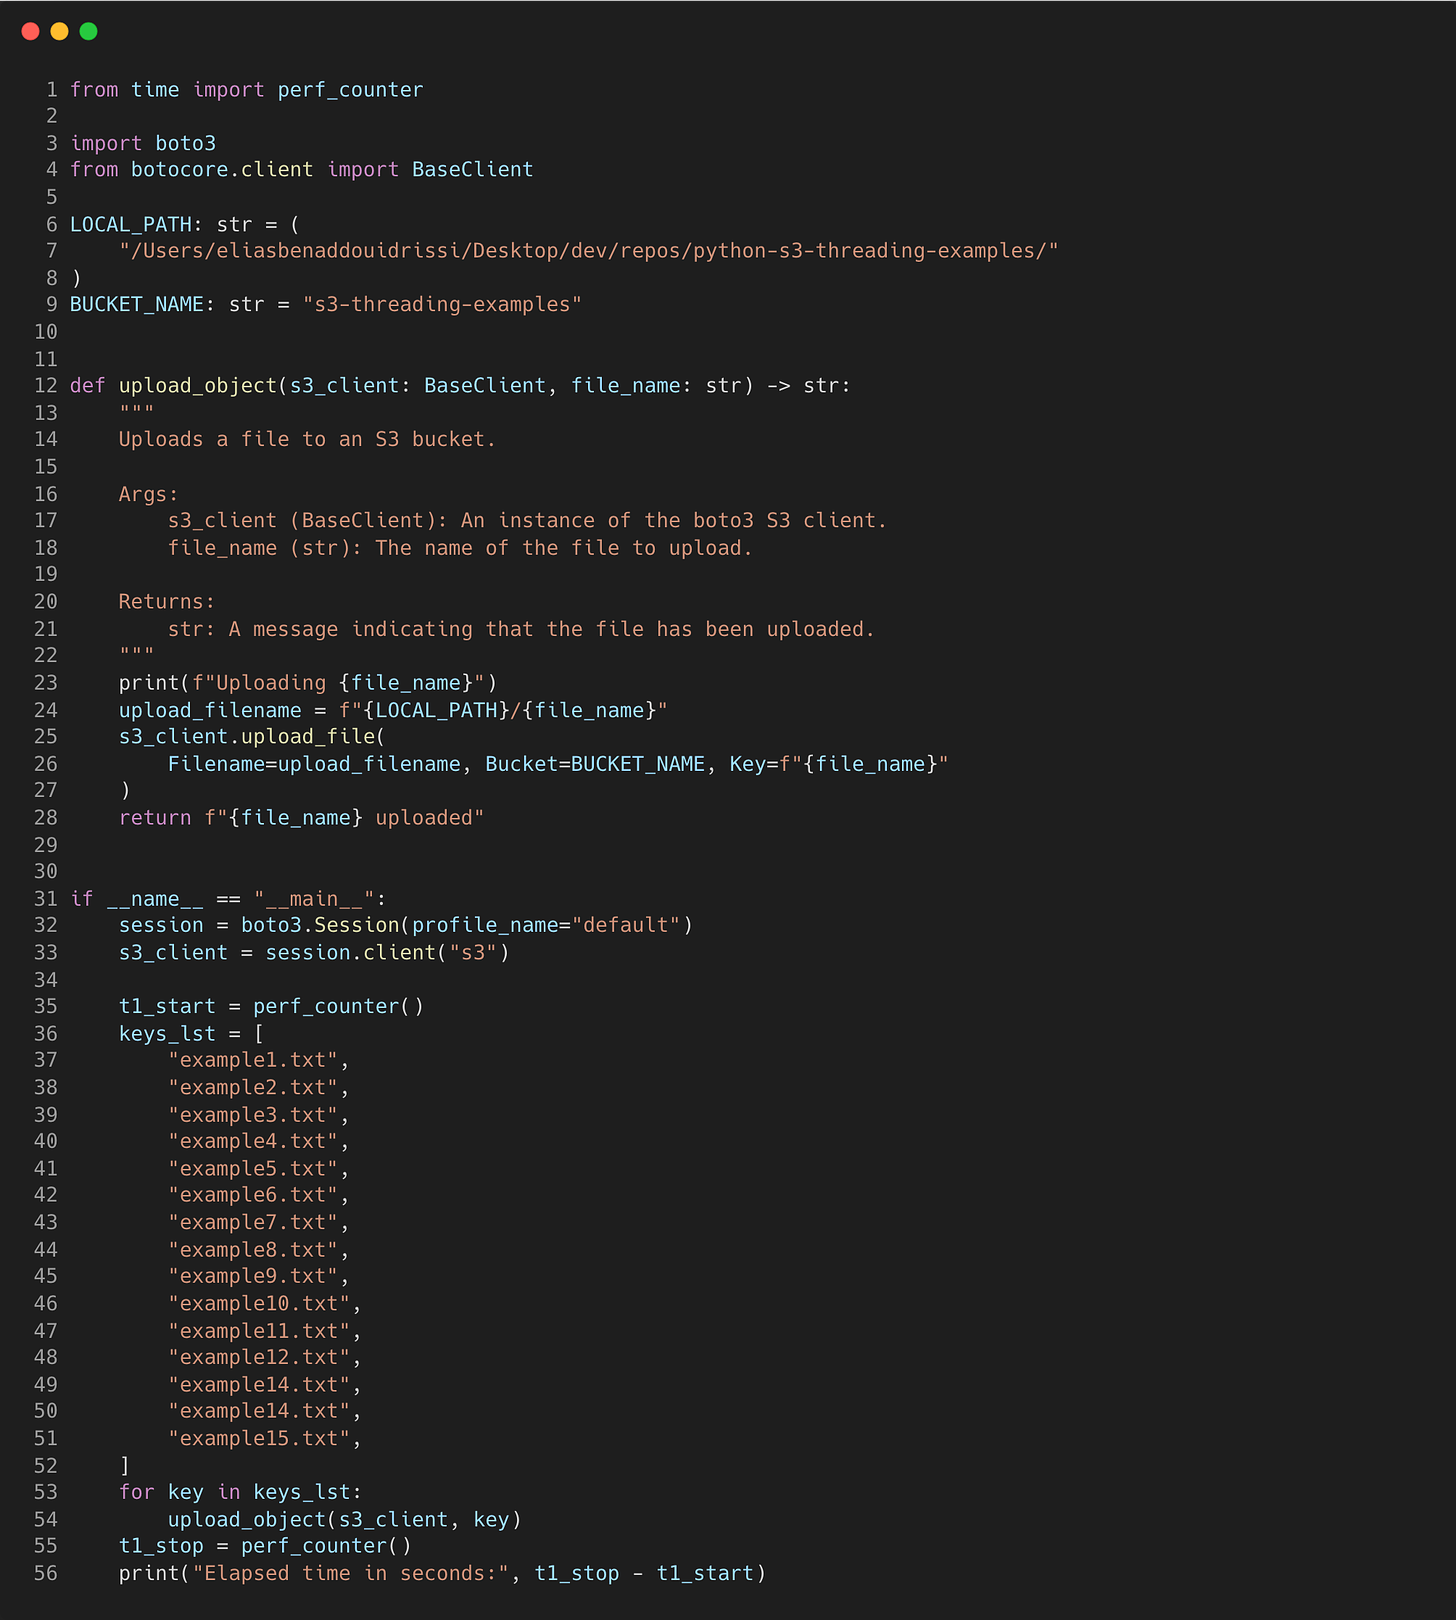
Running the “upload_object” synchronously on all 15 files instead took 3.86 seconds with the script below.
Although this is not a big difference in this example, using the script as part of a larger data pipeline would make a bigger difference. You’ll just have to ensure you’re using thread-safe operations to prevent hard to detect race conditions occurring.
Asynchronous
Since Python 3.4 the asyncio package has been part of the standard library and has evolved a lot over the versions. It works by utilising cooperative multitasking, meaning that the code indicates when context switching between tasks should occur.
The event loop controls how and when each task gets run and knows about each tasks’ status. Compared to the threading method, it is more scalable as it is less resource intensive than creating threads and race conditions are no longer an issue.
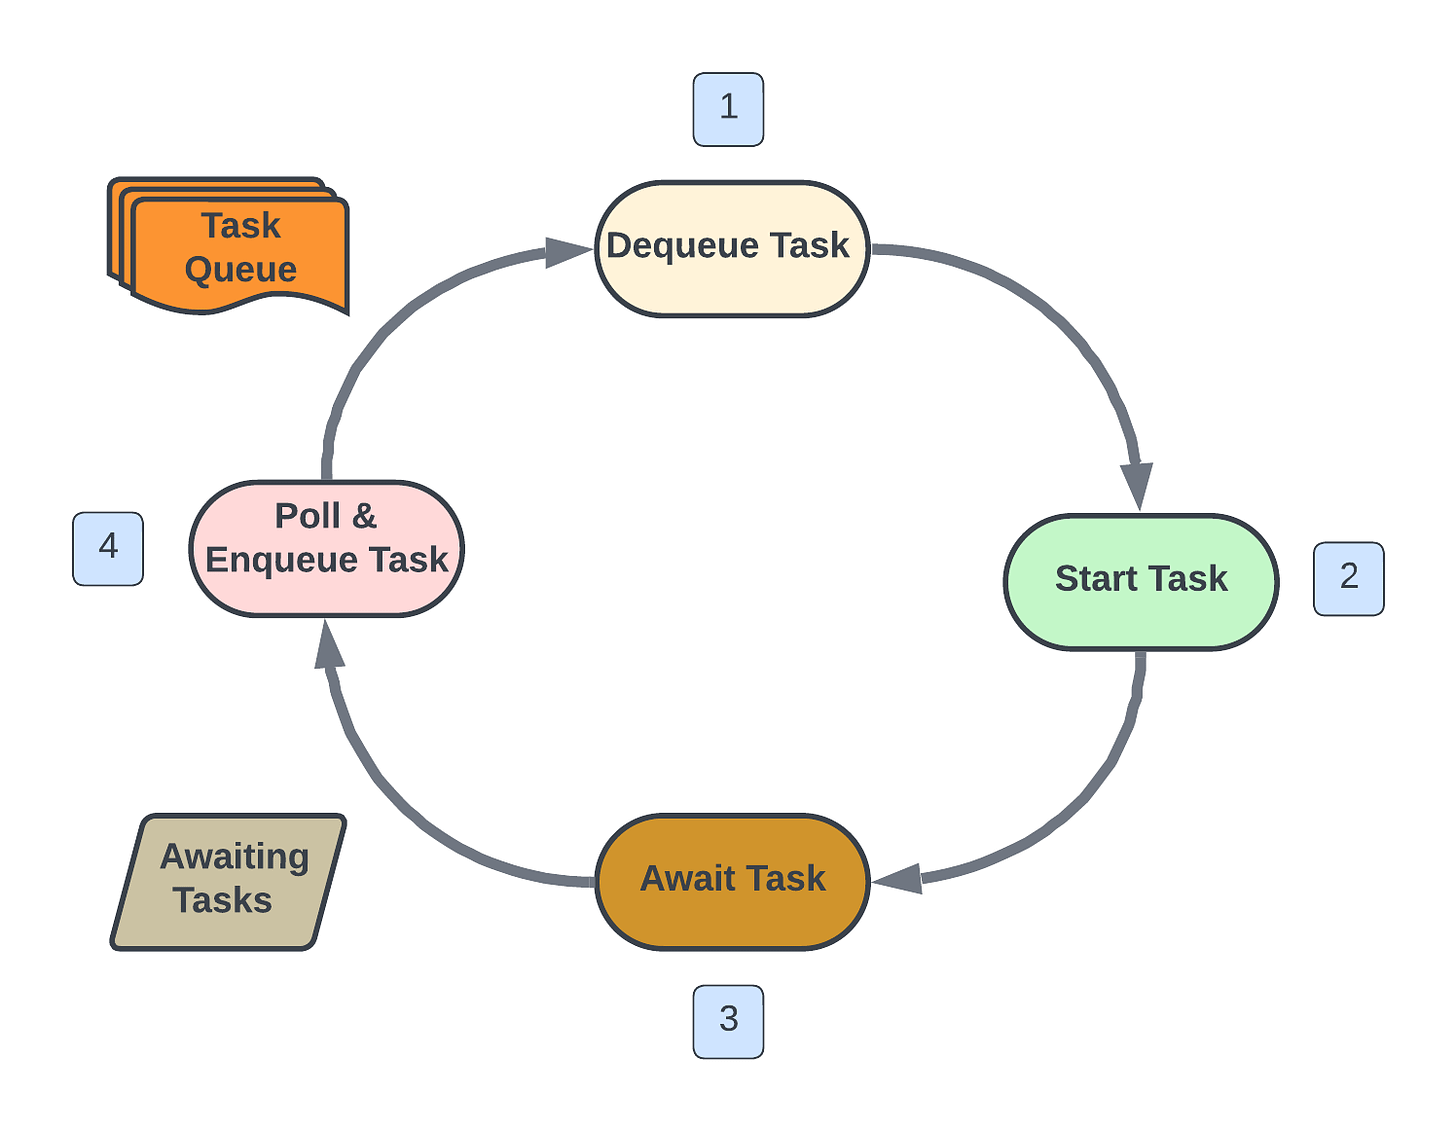
Conceptually, the event loop can be thought of as a circular flow where it starts with the first task in the queue getting dequeued (step 1) and then scheduled to start (step 2).
A common in data engineering is to make API calls to post or get data as part of a data pipeline. Once a request is made, the response then needs to be awaited (step 3). In that time waiting, the event loop will then poll and enqueue the next task from the task queue (step 4), then dequeue that task (step 1 again) ready to start this new task.
Let’s first break this down with a basic example and work through the cycle.
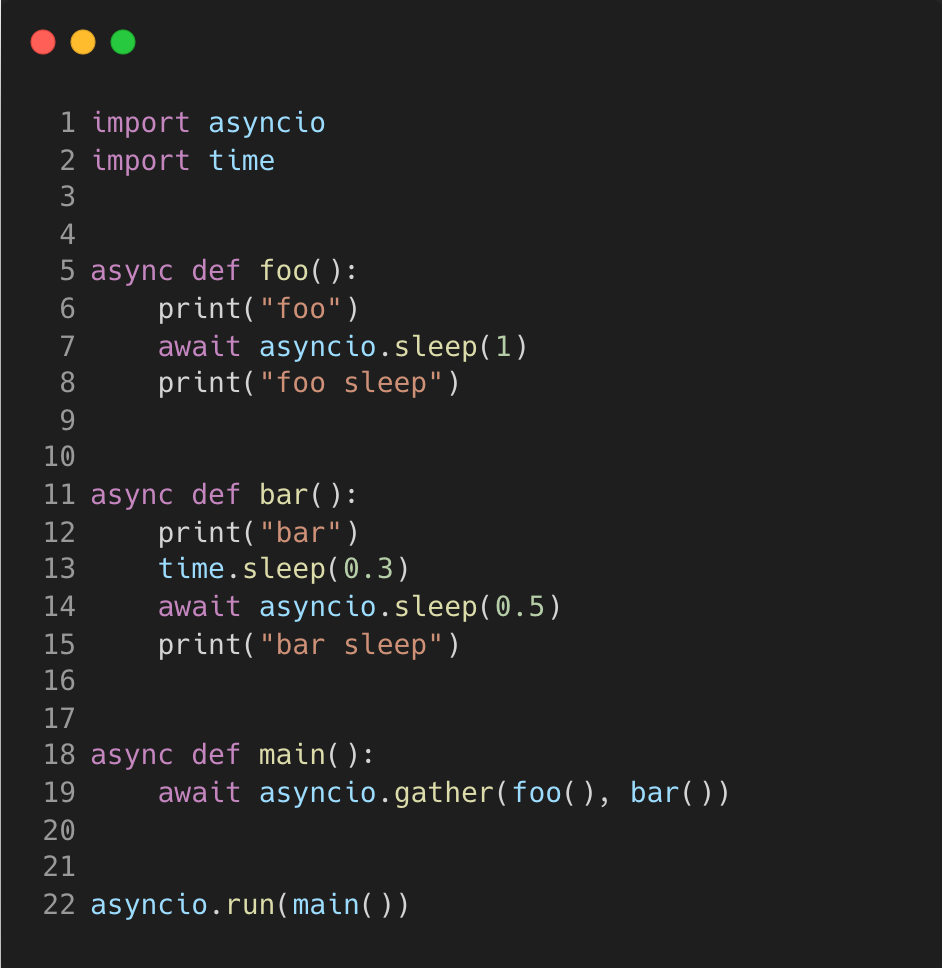
With asyncio comes new syntax and object types that are required to define async functions. A function becomes a coroutine (a specialised version of a Python generator function) when async is used in the function definition. A coroutine uses await to signal when to give control back to the event loop.
When this script is run, the first thing that will happen is the async function “main” will gather the two coroutines “foo” and “bar” into the task queue.
Calling the gather function takes the two coroutines as input and the event loop creates tasks for each one. The results are returned in the same order as the coroutines in the input once all coroutines are complete.
Referring to the conceptual diagram with the step numbers, this is what happens once the “gather” function is called and the created tasks are in the task queue:
→ 1. The foo task is first dequeued
→ 2. It is started, printing “foo” to the command line
→ 3. It is then awaited for 1 second, sending it the awaiting tasks block
When the task reaches “await asyncio.sleep(1)”, the function gives control back to the event loop to let something else be done in the meantime.
→ 1. The event loop regains control and task bar is now dequeued
→ 2. Task bar prints “bar” and sleeps for 0.3 seconds (this part is not async)
→ 3. It is then awaited for 0.5 seconds, sending bar to the awaiting tasks block
→ 4. After the 0.5 seconds, bar is enqueued
→ 1. Bar is dequeued again as foo is not currently in the queue
→ 2. It prints “bar sleep” and ends the function
→ 1. After 0.2 seconds, foo is enqueued since we slept for 0.8 seconds in total and at the beginning, foo was awaited for 1 second.
→ 2. It prints out “foo sleep” and ends the function
The tasks were interleaved due to the time spent sleeping and awaiting meaning they did not print in the order as defined in the functions. The tasks were each completed in their own scope, similar to how the operating system handles the switching of threads for a multithreaded solution.
The synchronous sleeping in the bar function simply shows how using async functions won’t speed up code where the CPU is being used. If the sleeping was replaced with computation, since only one thread is running, it will be at that step for as long as the computation takes.
This makes asyncio useful for I/O bound tasks where work is being on on a remote server instead.
An important thing to note with asyncio is that not everything can be made asynchronous just by using the syntax. One method is to use the “asyncio.to_thread()” function which will combine threading with asyncio to achieve it.
A more complete method is to use the libraries created specifically for asynchronous implementation such as aiohttp for making asynchronous requests and aiofiles for file support.
In the next section, we’ll look at writing a script to concurrently call an API endpoint multiple times and write the data locally.
Asynchronous Requests
Making requests is a typical example of where asynchronous functions can speed up your script execution time.
The obvious benefit comes when you need to make many API calls as each call will have a potentially small but non zero waiting time for the request to be made and a response to be processed.
aiohttp enables us to open a client-side session that creates a connection pool that allows for up to 100 active connections at a single time.
As long as you don’t hit the limit of the API, you could save time by allowing the event loop to handle the trigger of each API call as soon as the previous one has been made, rather than waiting for it to complete.
Python’s request package isn’t compatible with asyncio since it uses http and socket modules which are blocking operations, whereas aiohttp provides methods which return awaitables or coroutines.
You can also leverage the aiofiles package to make writing to disk a non-blocking task, so that multiple writes to a single file can happen on the same thread without blocking one another.
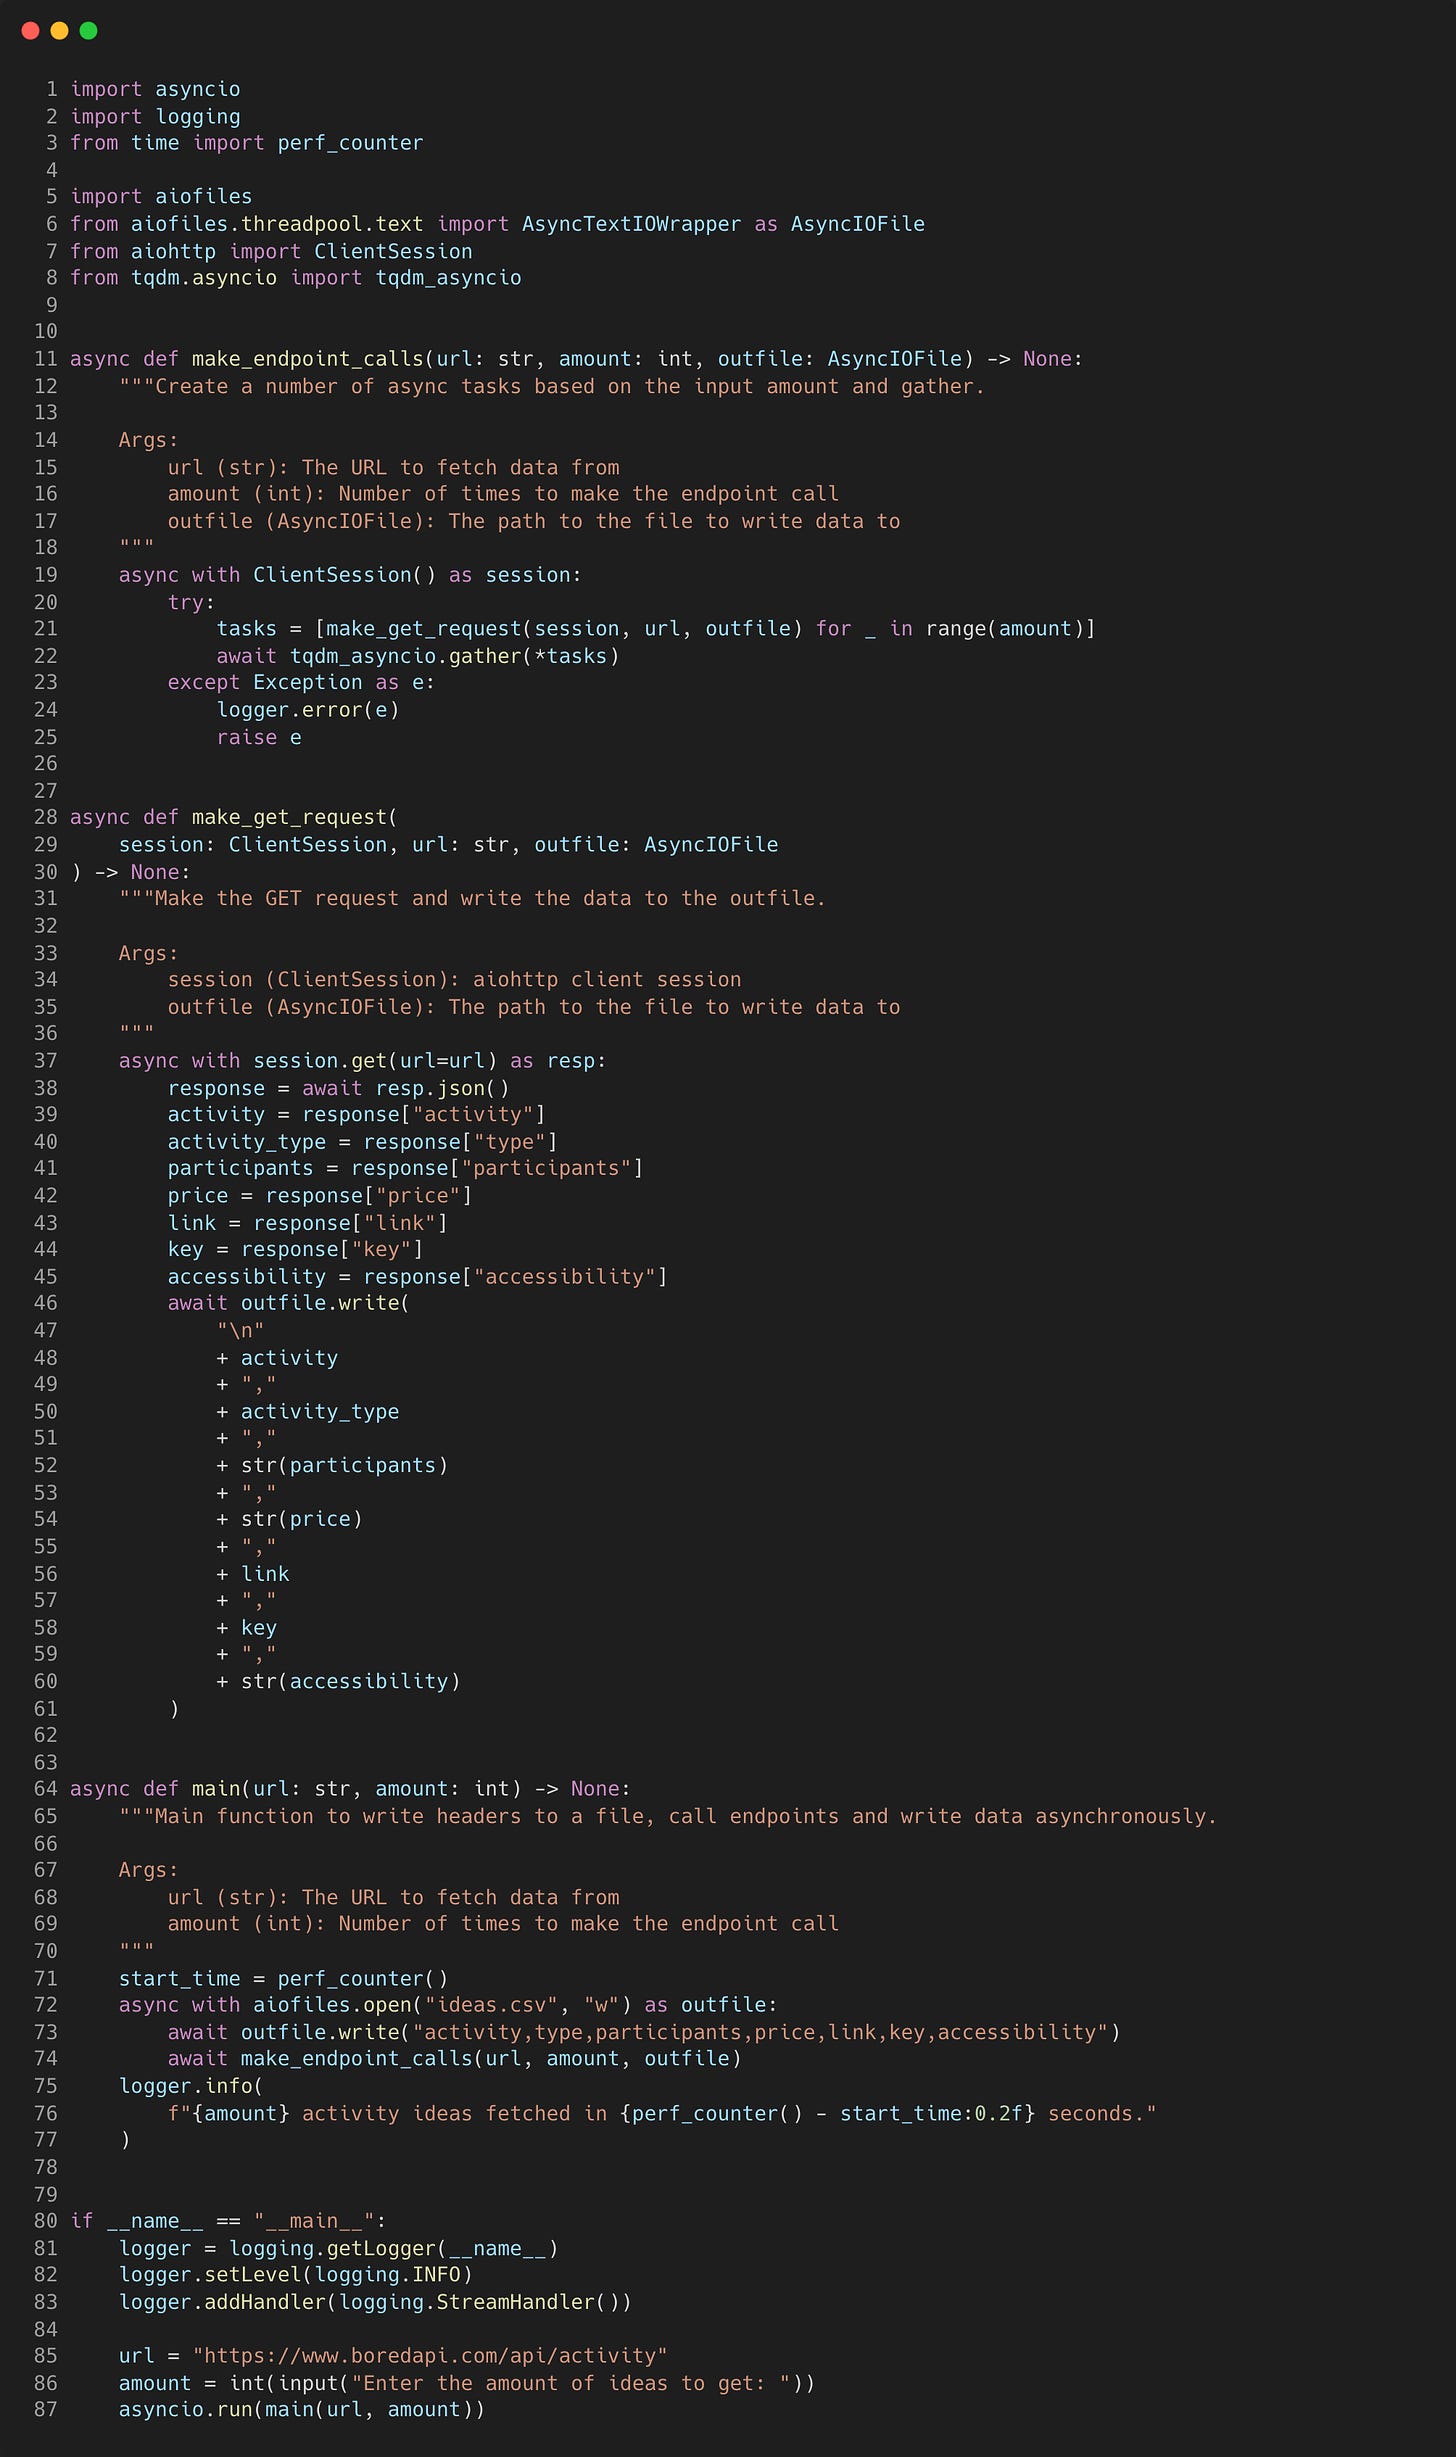
If you’re starting to get bored of reading about concurrency, let’s see how we can quickly make multiple requests to this bored API to get a list of activity ideas.
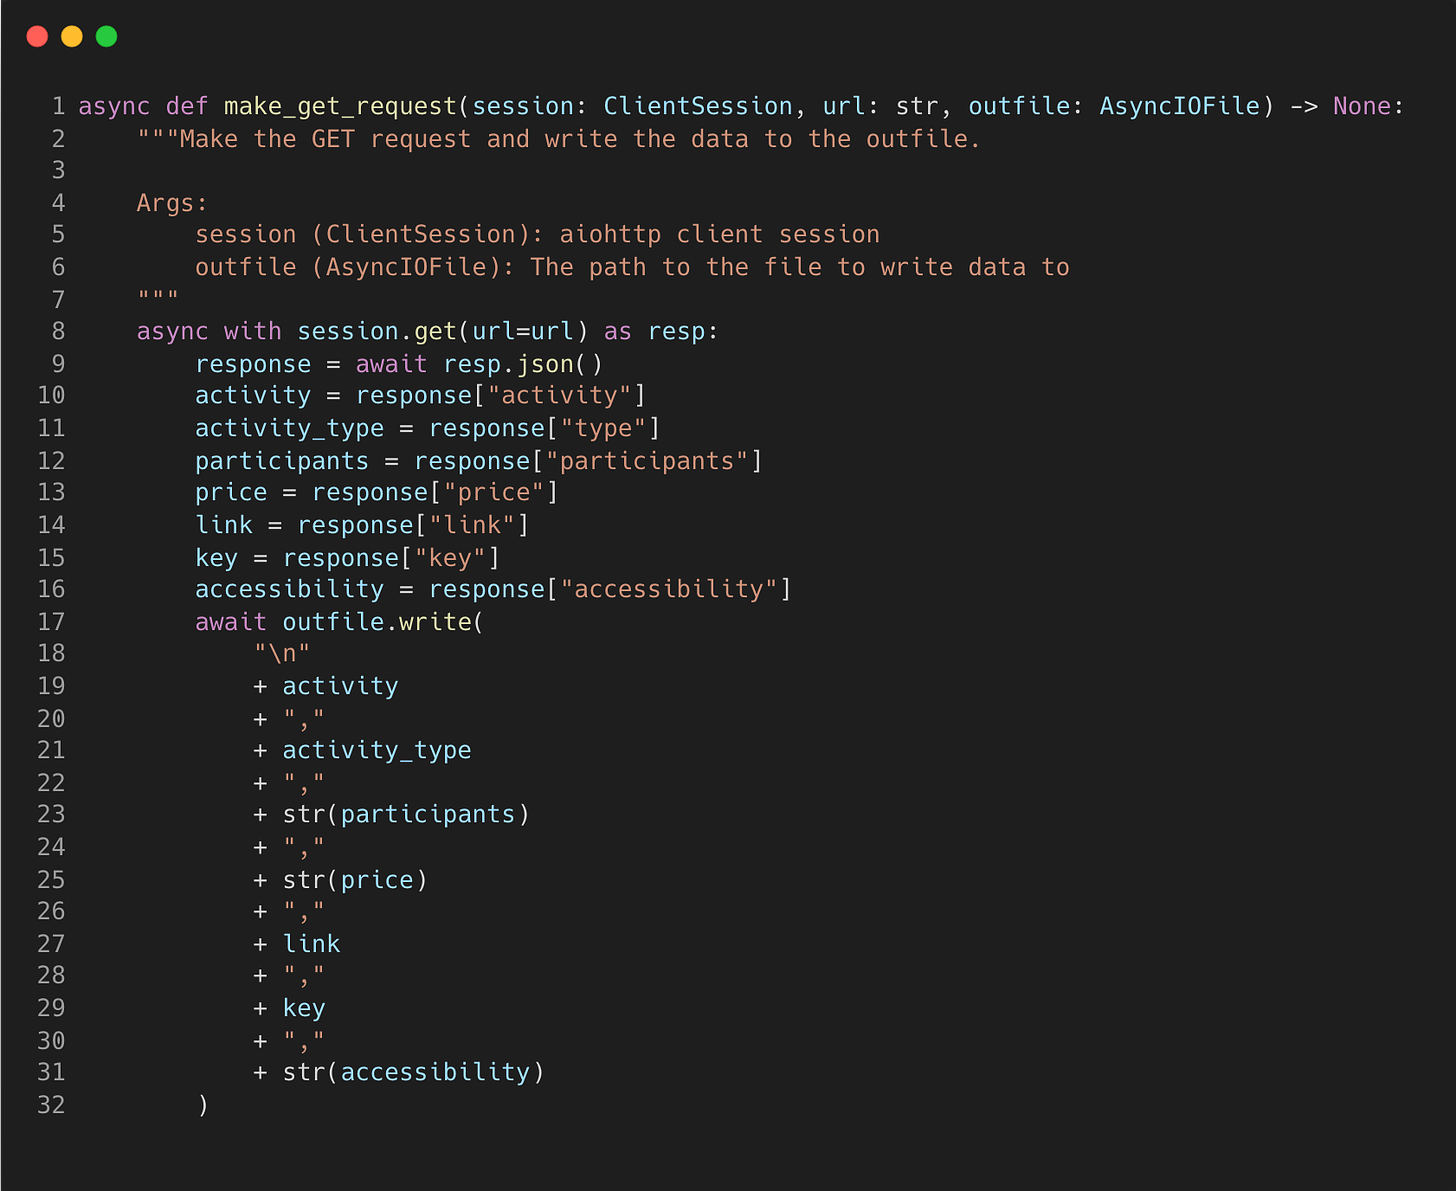
When this script is ran, it will start by setting up the logging and taking a user input “amount” for the number of asynchronous API calls we want to make. There are three asynchronous coroutines defined, which are chained together so that they can await each other.
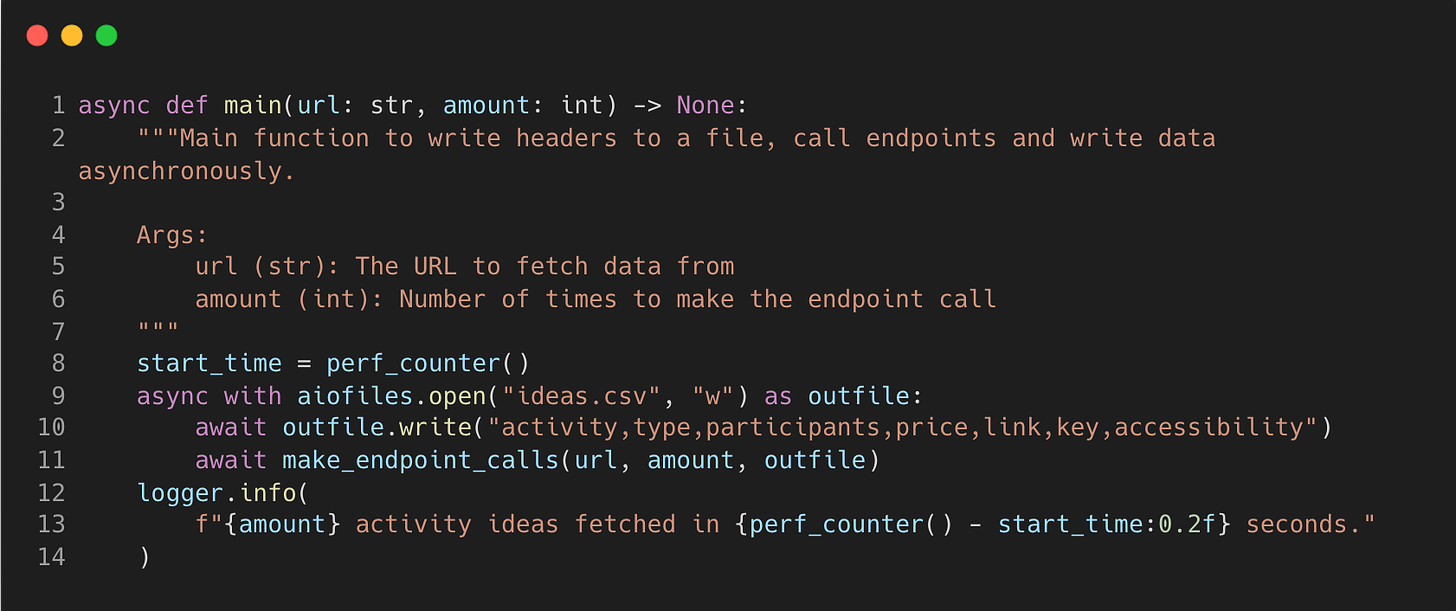
Looking at the first “main” coroutine, it opens a CSV file using the aiofiles “open” method within a context manager and writes a header line into the CSV.
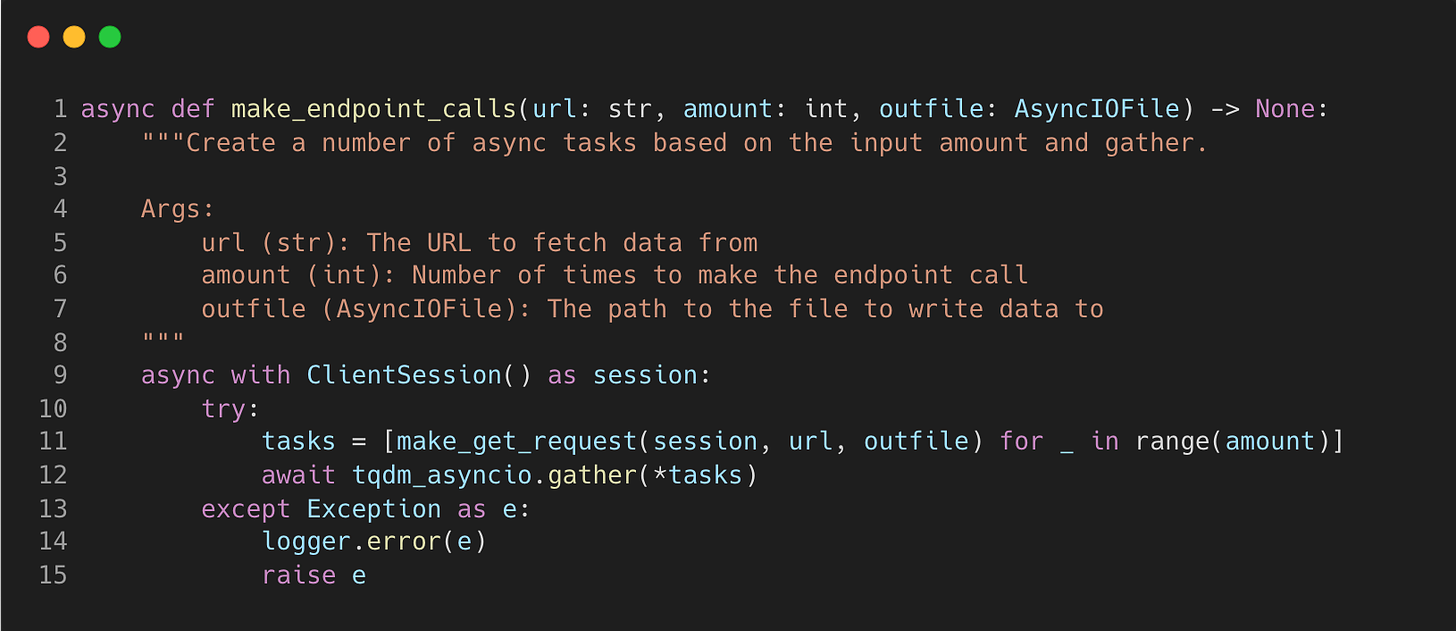
The next chained coroutine “make_endpoint_calls” will take the URL, amount and the output file and create tasks to add to the event loop.
Here we must use the ClientSession object from the aiohttp package so we can make non-blocking get request operations. A list comprehension is used to create a list of tasks for the amount specified at the beginning. We then await the tasks by using the gather method which will schedule the tasks in the event loop.
In this example, I’ve imported the “tqdm_asyncio” method that is a wrapper around the original so that we can print out a progress bar for a nice visualisation.
Each task will execute the “make_get_request” function, but they will not be executed in the same order as passed in. The JSON response is broken down into a string and written to the CSV file.
Running this script and inputting an amount of 100 takes only 0.96 seconds to complete.
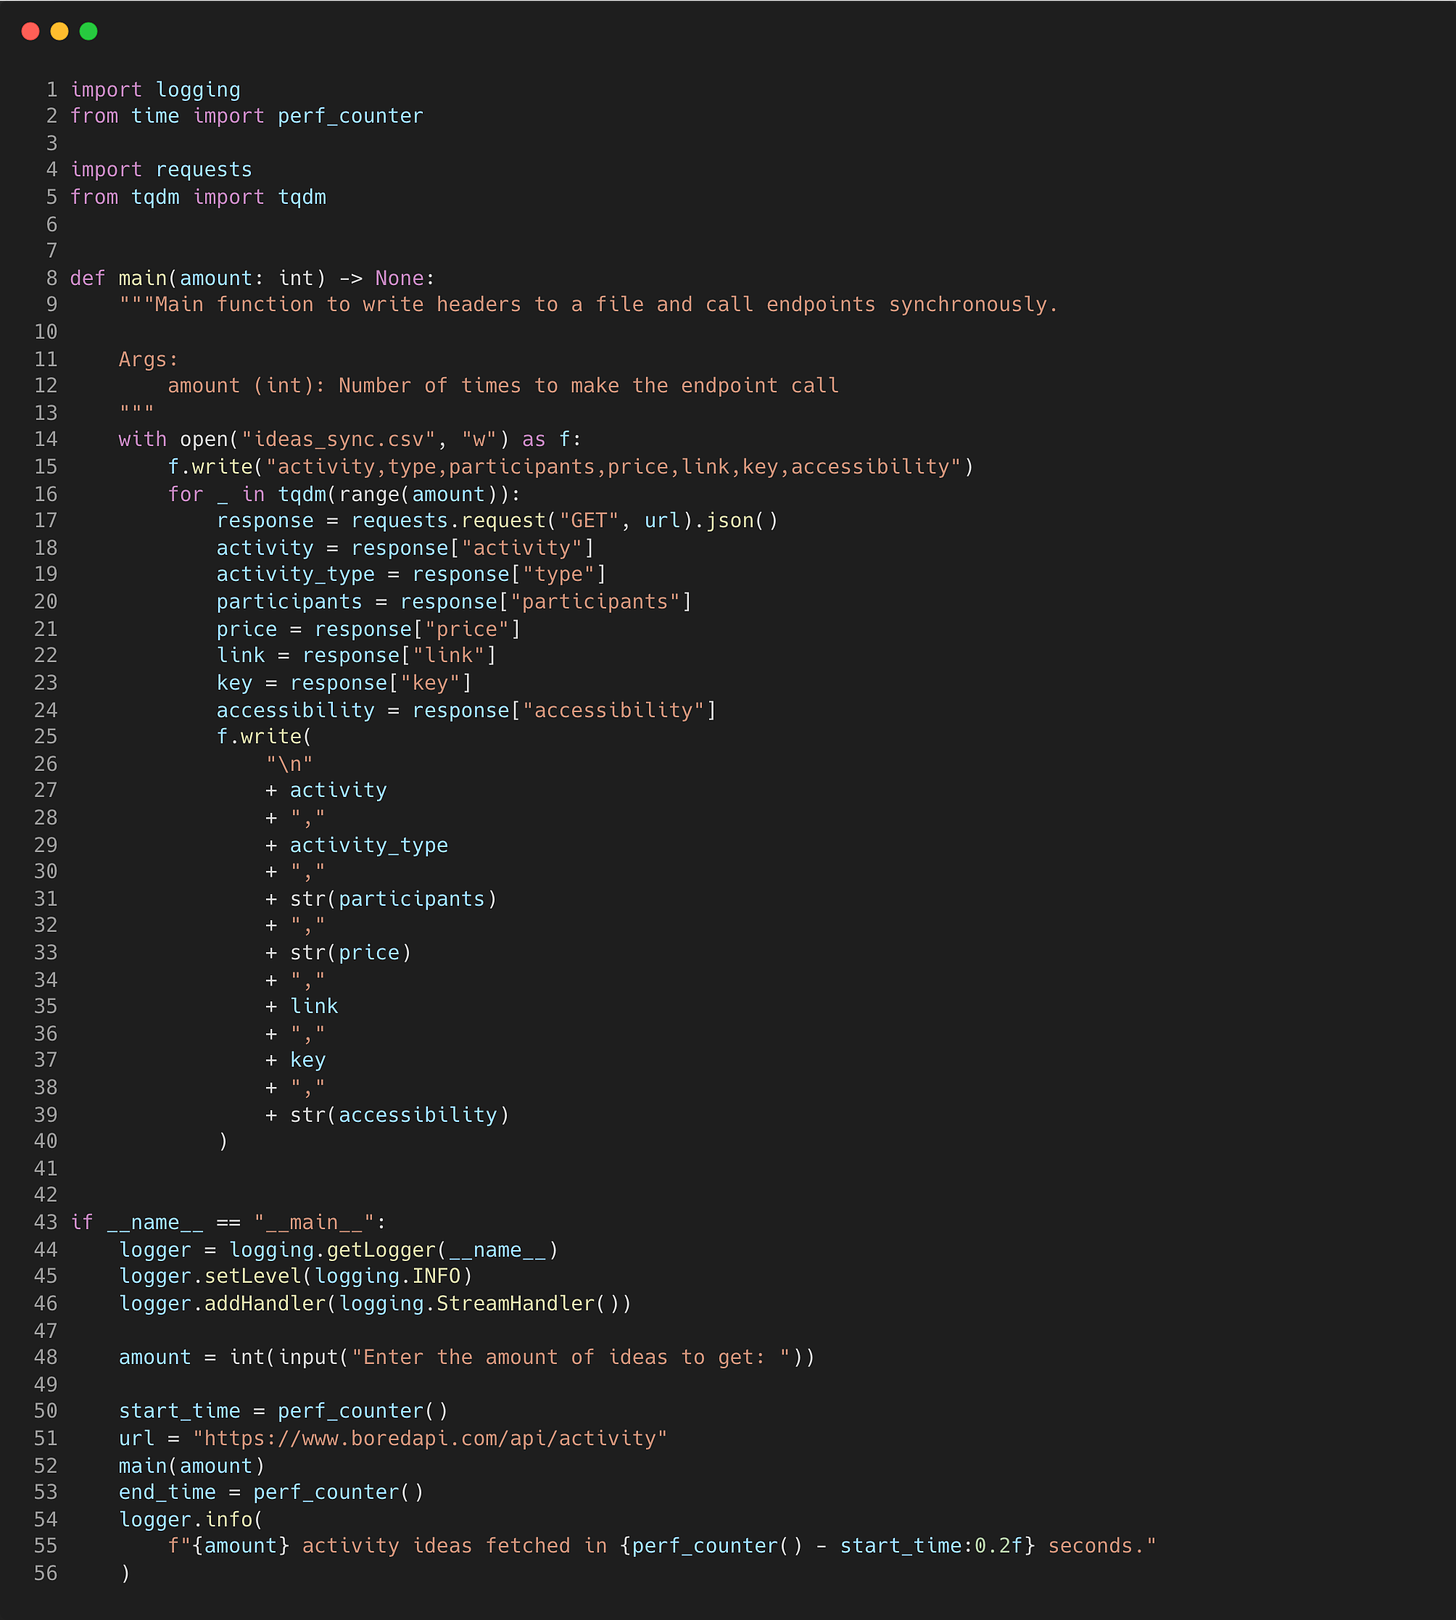
Here’s how we can do the same thing synchronously, by using a for loop to make each request and write to the file sequentially.
It takes almost 30 seconds to make 100 requests and to write them to the file sequentially, making asyncio a clear winner.
Going back to the asynchronous code, there has been many changes to the asyncio package since it was first released.
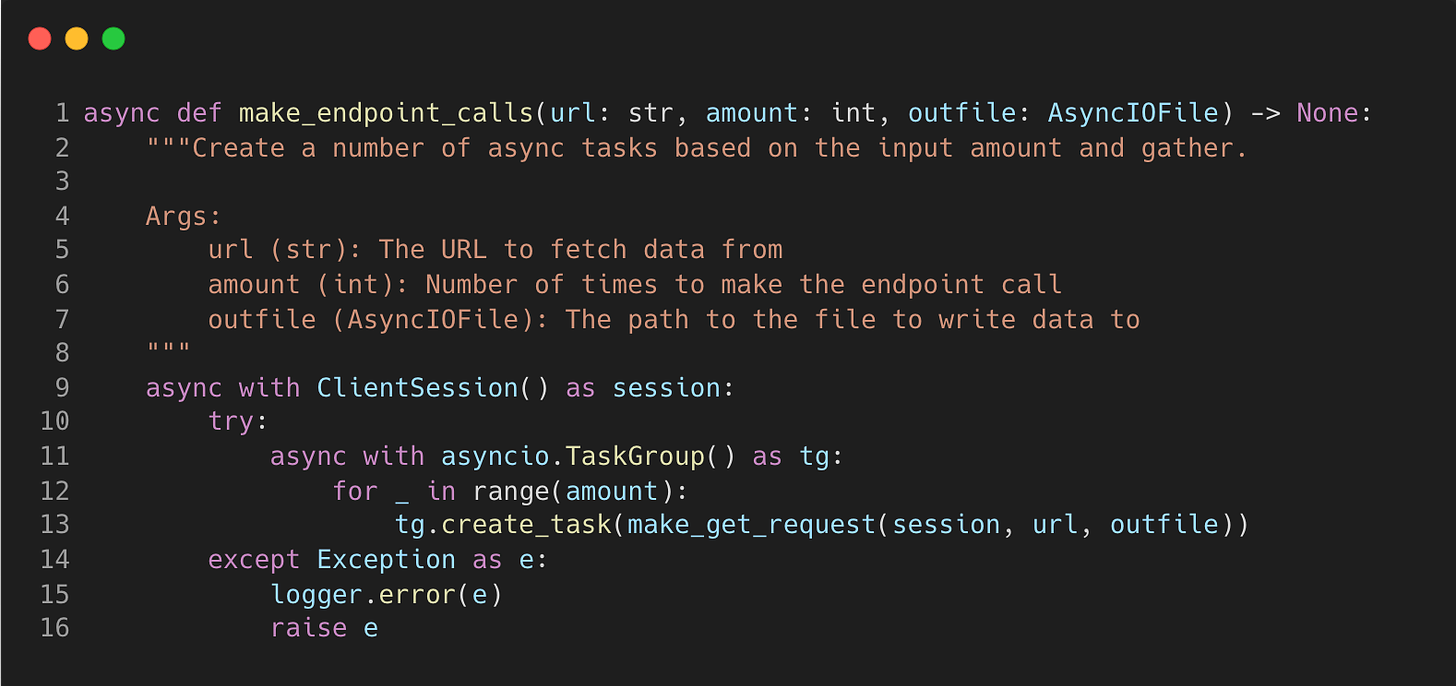
With Python 3.11, we can change the “make_endpoint_calls” function to use the TaskGroup context manager.
An asynchronous context manager implements the __aenter__() and __aexit__() methods which can be awaited, which are called automatically when the context manager block is exited. This will await all tasks created by the TaskGroup.
We can now use the “create_task” method within a for loop, which replaces the use of the “gather” method used in the original script.
Within the try/except block, if any coroutines raise an exception, then the function will immediately cancel all remaining tasks and raise the exception.
Thanks to Exception Groups being introduced in Python 3.11, it works well with asyncio’s TaskGroup method as all errors could now be propagated for error handling, rather than only the first encountered error.
For an in-depth read into handling concurrent errors, I recommend a read of this article by Real Python.
Multiprocessing
With Python multiprocessing, you really have things running in parallel. The multiprocessing library creates separate instances of Python interpreters to run code across multiple CPU’s.
The global interpreter lock restricts the multithreading and asyncio example code above to run on a single CPU. This means multiprocessing is not going to speed up any of the previous examples as they are I/O bound and network operations.
Compared to spawning threads, there can be more overhead required for creating and managing processes. When using the multiprocessing.Process class, the processes are individually created and joined.
This process management overhead becomes more significant when the tasks are relatively small, and the cost of creating and managing processes outweighs the benefits.
One of the areas multiprocessing would be beneficial is within data science data processing. With large amounts of data, splitting it between processors will get more computations done faster.
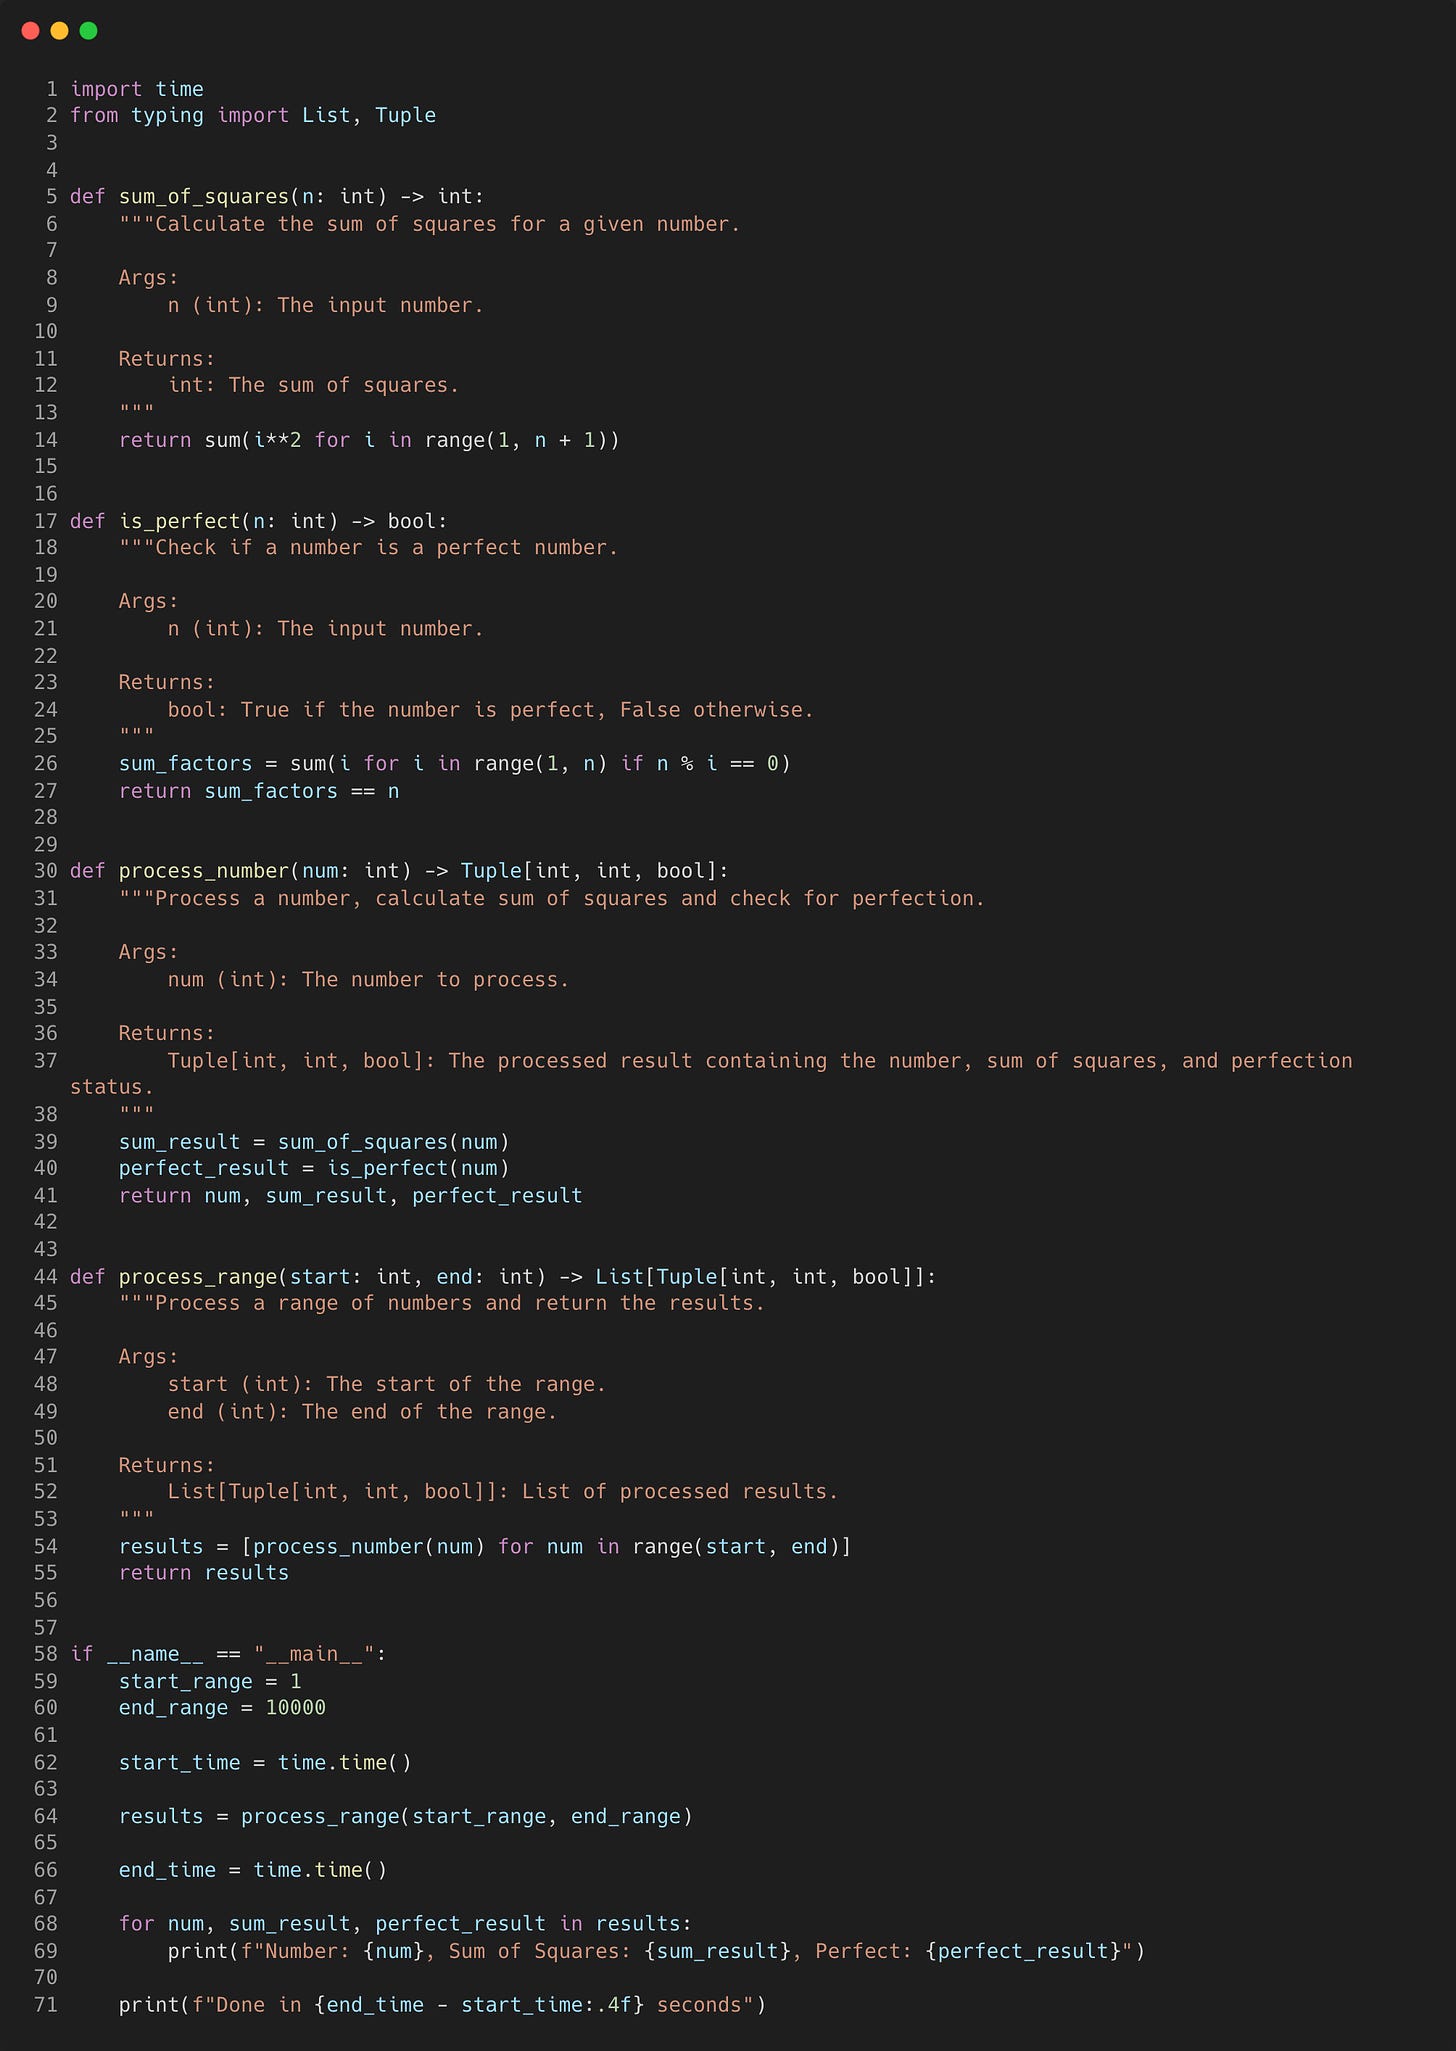
Let’s look at a basic example script which sums up the square and checks if it is a perfect number. First we'll look at the synchronous version using a for loop.
When running this synchronous version, it takes just over 10 seconds to run this loop for 10,000 numbers.
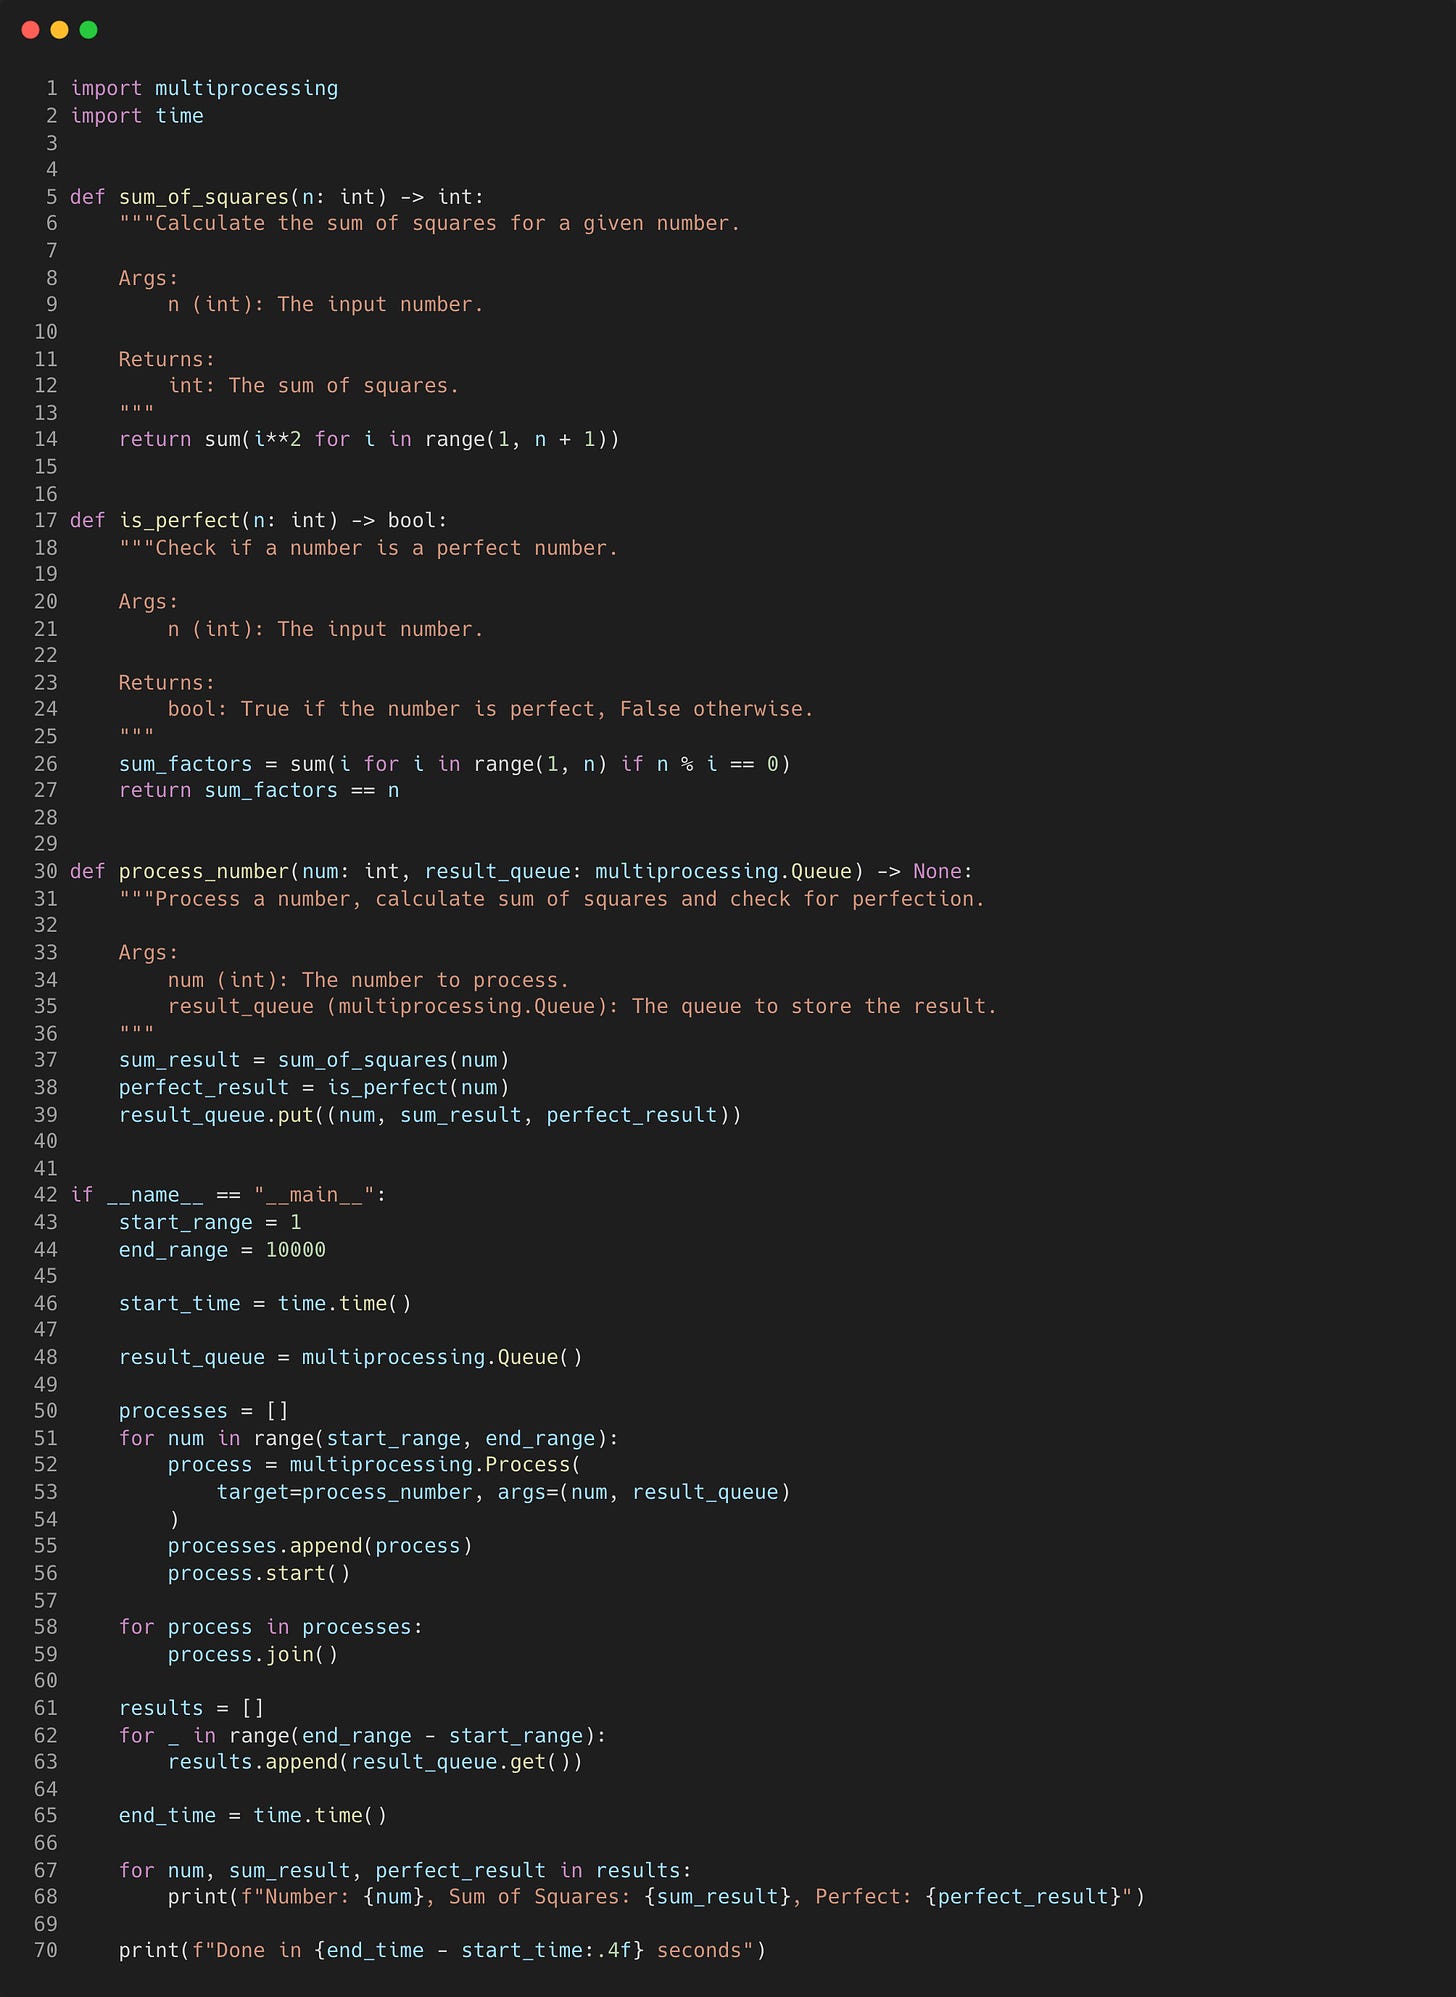
How much can we speed it up by using the multiprocessing.Process class? Here we will divide the task of processing a range of numbers into multiple independent processes, each handling a subset of the workload.
Compared to the synchronous version, the “process_number” function in the script above will not return the results directly. Instead, they are put into a multiprocessing queue “result_queue” for later retrieval.
In the main section, a queue is initially created and for each number in the range, a process is created and added to the list of processes, with the “process_number” function as the target.
The processes are then joined and the results of each computation are retrieved from the result queue.
Running this on my M1 MacBook caused it to begin to lag severely and it started throwing all sorts of FileNotFound errors.
Managing a large number of individual processes can clearly lead to resource constraints and performance issues like this.
Reducing the range of numbers to 1000 stopped any errors being thrown, but clearly is not worth it as it is now taking 6x longer than what the synchronous version would take.
A better approach would be to use the multiprocessing.Pool class which is often more efficient for managing parallel tasks, to reduce the overhead.
It is designed to manage the processes and distribute the workload effectively, providing a high-level interface for parallel processing.
It’s like having a team of workers at your disposal, each assigned to specific tasks which takes charge of creating processes when needed.
This abstraction lets us focus on the tasks at hand without getting into the details of managing individual processes.
This version is quite similar to the synchronous code, except that the multiprocessing pool is implemented in the main section. I’ve also added a line to print out the process id being used for each iteration.
Here we use the context manager to ensure that resources are properly managed and released when the block is exited.
The “starmap” method applies the “process_number” function to each tuple in the iterable and returns a list of results, distributing the tuples to different worker processes in the pool.
Running this optimised version with the Pool class reduces the time taken for a range of 10,000 numbers to only 2.1 seconds.
Closing Thoughts
Depending on your use case, concurrency can significantly speed up your data processing pipelines.
For CPU heavy computations, the multiprocessing.Pool class is a simple way to parallelise your script. It scales better than using the Process class as it optimises based on your system. If you need more fine grained control however, the multiprocessing.Process would be a better option.
Multithreading provides a way to speed up your scripts without requiring more CPU’s through creating threads and context switching. As long as your code is thread safe, you shouldn’t need to worry about race conditions and buggy behaviour.
If you want to know exactly what is being run concurrently and when within your script, Aynscio provides a Pythonic interface to speeding up your IO bound operations by managing an event loop that handles awaiting tasks as you’ve defined them.
The ability to created nested awaitables means you can control when groups of tasks must run concurrently, although you must ensure that other packages used within your script have an asynchronous implementation too.












Excellent